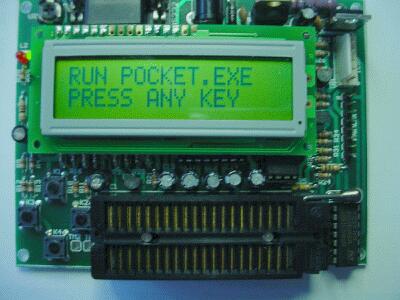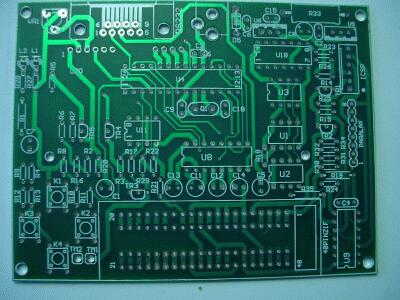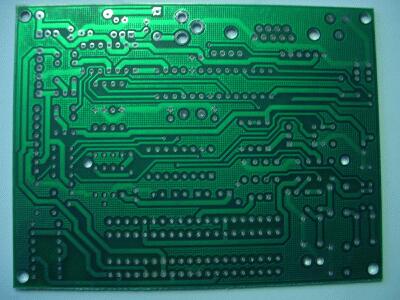
Note: the ZIF is not included with the kit. The one in the picture I scrounged.


http://www.bubblesoftonline.com/pocket/pocket.html
{ed: Tony moved on, the web site is closed, but all the files are here:
Also available are Unix tools for the Pocket Programmer by Brandon Fosdick}
HOT! Tony Nixons Pocket Programmer. The Pocket Programmer is a stand alone serial programmer that can program most of the PICmicro®MCU range of microprocessors. (12C6xx, 16Cxxx, 16Fxxx, 18Cxxx) It works from a single 18VDC supply or with 2 X 9 volt batteries. Combine this with 64K of on board EEPROM which can store upto 32 HEX files and you have a truely portable programmer / patcher.
This unit is a must for field work!
Here is the schematic from the pdf file as a huge gif or png. The source code for this programmer is open so that the user can customize it for their own purposes or read it to learn how a PIC can program a PIC. Customise the software yourself if you like. PLEASE consider sharing your modifications...
The original kit did have a few SMT components, but the pads were oversized and so it is not as hard as you might think. Took about 2 hours to put together. The assembly instructions in pdf format (cached 20010523135942) and CSS HTML 20010904105856 and everything else is installed by the Win32 specific install program in the download .zip file (cached 20010523135942). The biggest problem was that the board did not have a solder mask or component placement silkscreen.
Andrew Sorriaux sent some pictures of his version.
With Tony's blessing, http://www.piclist.com, in cooperation with http://www.olimex.com, is producing a new kit with an easy to assemble board (no SMT, with solder mask and component silkscreen) and all parts (except the ZIF socket) for $70. (we are looking for a good, low cost, ZIF socket... please let us know if you know of one). Some possible sources include:
The boards are excellent! Olimex.com has done their normal great job! The clear silkscreen and parts list (see below) makes assembly a snap. Pin one is clearly marked on the silkscreen for all polarized components. The PIC16F876 comes pre-programmed so the unit is ready to go when you power it on. Just do a complete check of the parts for correct orientation and give the PCB another look over and check for possible shorts and joints that have not been soldered before you apply power and switch it on. The LCD is probably still blank, so turn the contrast pot away from the RS232 socket to make the display visible. When turned on without operational data available, the Pocket will display this message.
RUN POCKET.EXE
PRESS ANY KEY
Turn off the power, download pocket.zip from
http://www.bubblesoftonline.com/pocket/pocket.zip,
run the setup program, edit pocket.dat so that it contains the number
of the com port you will use
and run pocket.exe from your installation directory. Read through the help
to discover how to set up and calibrate the programmer and then how to use
it. DO NOT USE A NULL MODEM CABLE TO CONNECT THE POCKET TO YOUR PC!
The correct connector wiring is straight through: Pin 1 to pin 1 etc...
The new pocket programmer kit is available for in the US through this site. Proceeds support the site.
| Pocket Programmer: Kit $80.00 (+ s&h + tax in CA) |
Out of Stock! Sorry! You can place an advanced order for the next shipment, or order the board below: |
|
| Pocket Programmer: Printed Circuit Board $22.00 (+ s&h + tax in CA) |
Out of Stock! Sorry. |
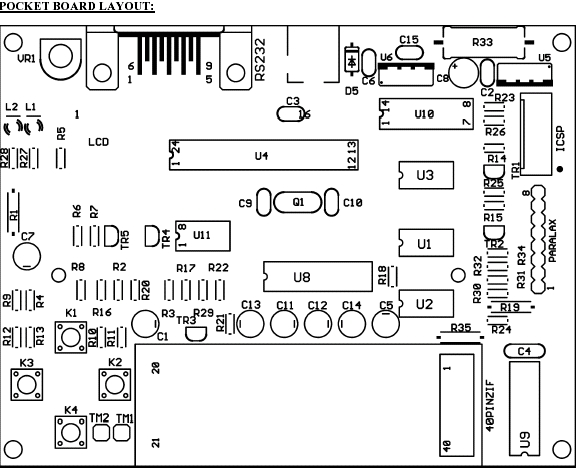
Here is the schematic gif (very close to the same as Tony's original) and the board layout pdf and here are some pictures of the first board:

Note: the ZIF is not included with the kit. The one in the picture I
scrounged.


| POCKET KIT BILL OF MATERIALS: | ||
Component |
Description and notes |
|
| R1 | - 82 ohm 1/4W 5% | |
| R33 | - 100 ohm 2W 5% | |
| R27,R28 | - 220 ohm 1/8W 5% | |
| R12,R13,R14,R15,R16, | ||
| R17,R23 | - 1K 1/8W 5% | |
| R30 | - 1.5K 1/8W 5% | |
| R29 | - 2.7K 1/8W 5% | |
| R3,R4,R5,R25,R26,R31, | ||
| R32,R34 | - 4.7K 1/8W 5% | |
| R18 | - 6.8K 1/8W 5% | |
| R19 | - 10K 1/4W 5% | |
| R20,R21,R22,R24 | - 10K 1/8W 5% | |
| R2 | - 18K 1/8W 5% | |
| R10,R11 | - 22K 1/8W 5% | |
| R6 | - 33K 1/8W 5% | |
| R8,R9 | - 47K 1/8W 5% | |
| R7 | - 82K 1/8W 5% | |
| R35 | - 470K 1/4W 5% | |
| VR1 | - 5K TRIMMER | |
| C9,C10 | - 22pF 25VDC NP0 10% | |
| C4 | - 10nF 25VDC 10% | |
| C2,C3,C6,C15 | - 100nf 25VDC 20% | |
| C5 | - 1uF 25VDC 20% | |
| C1 | - 2.2uF 25VDC 20% | |
| C11,C12,C13,C14 | - 4.7uF 25VDC 20% (for MAX232: originally 1uF) | |
| C7 | - 10uF 16VDC 20% | |
| C8 | - 47uF 16VDC 20% | |
| Q1 | - quartz resonator 4MHz | |
| L1 | - green LED 3 mm | |
| L2 | - red LED3 mm | |
| D5 | - 1N4004 (or 1N4001) | |
| TR5,TR4 | - BC337-40 | |
| TR1,TR2,TR3 | - BC327-40 | |
| U10 | - 74LS06 | |
| U9 | - 74HC126 | |
| U5 | - LM7805 | |
| U6 | - LM7808 | |
| U1,U2,U3 | - 24LC256/P on DIL8 sockets | |
| U11 | - LM358 | |
| U8 | - MAX232 | |
| U4 | - PIC16F876-04/P on DIL28 socket | |
| LCD | - LCD DISPLAY 16x2 | |
| LCDdistance | - 2x10pin female distance connector | |
| LCD1 | - 1x6pin male connector to LCD pins 1-6 | |
| LCD2 | - 1x4pin male connector to LCD pins 12-14 | |
| PWR-JACK | -Plug in power supply jack | |
| 40PINZIF | - ZIF socket 40 pins or 4 pcs 1x20pin female row sockets | |
| PARALAX | - 8pin male connector | |
| ICSP | - 6pin male connector | |
| RS232 | - DB9 9 pin female connector | |
| K1, K2, K3, K4 | - push buttons | |
Assemble the unit by matching the parts to the parts list above and then inserting them into the space for each part as labeled on the PCB.
If you are satisfied that all is well, apply power and switch it on. The LCD is probably still blank, so turn the contrast pot away from the RS232 socket to make the display visible. When turned on without operational data available, the Pocket will display this message.
RUN POCKET.EXE PRESS ANY KEY
If the display has not responded with that message then you have done something wrong. Please go over you work again and make sure that 5 volts appears on the correct power pins on each chip.
Turn off the power, download the software from http://www.bubblesoftonline.com/pocket/pocket.zip or http://www.piclist.com/images/com/bubblesoftonline/www/http/pocket/pocket.zip, run pocket.exe from your installation directory and open the help file. Read through it to discover how to set up and calibrate the programmer and then how to use it.
How to wire up a suitable serial connection for the PC: With a male to femail DB9 serial connector, just wire pin 1 to pin 1, 2 to 2, etc... Do NOT use a "Null modem cable" Since this will swap pin 2 with 3 etc... and cause the RS232 drivers on the Pocket to possibly burn out.
Questions:
I am very very interested in getting one of these kits, the section above says sold out and has for some time now, do you plan to start production of these kits again? if anyone is willing to sell theres I would be willing to buy it too.
Hello Here it is mentioned that the sourse code for the windows interface for the Pocket programer is available for download.But so far I cant locate it. Please link me or suggest.I am developing a new pic programer I want a professional example of windows driver.Thanks in advance
James Newton replies: The programmer firmware is open source not the windows GUI.+
Sir,
I am a student of electronic engineering looking for diversifcation into the PIC programmers. I like to have preprogrammed chip 16F876A for my dev board since you have told that the bare board is not available and the dev board too. Kindly inform me for two pieces of the same in USD including postage by air mail. If I can program them myself without need for purchasing from you kindly guide me how to do it. Kindly note I am not a trader but an engineering student engaged on project works.waiting your reply by e mail at your earliest
brinda
adithyan@vsnl.net
James Newton replies: The source code is available as is the chip image, you need a device programmer for the PIC16F876-04P and the MPLAB IDE from Microchip. Or you can try to hire someone to program the chip for you. I do not have programmed chips available.+
I built one!!! using PIC 16F876A .pocket.exe is good working with programmer board and the chipdata upload was successful using the pocket.exe but the pocketpro programmer fails to communicatte with the programmer!!!when I press any key of pocketpro, show this message(NO RESPONSE FROM PROGRAMMER BOARD)!!!!what could be the problem?
I built one!!! using 24lc64 eeproms the chipdata upload was successful using the pocket.exe but the pocketpro programmer fails to communicatte with the programmer!!! what could be the problem?
Anyone's help is highly sought after!!!
James Newton replies: Sounds like a windows serial driver problem. If you have a different machine, try it there.+
Hey, Where the heck is this Pocket Programmer by Tony Nixon as pictured above??? I found the Kit 149 & 128 at kitsrus.com but can't find anything anywhere (on the net) that looks like this guy; field programmer with LCD. bubblesoftonline.com doesn't seem to exist anymore. Where do I find these puppies? Thx.
can I use 24lc64 for the eeprom outright? or do I need to do some code modification coz it's hard to get it here in the philippines can anybody help me out?
Does anyone have a working chipdat segment for the 16F627 or 16F628? I tried to write one but am having trouble getting the fuse configuration to program properly. Any help would be appreciated. Thanks in advance. I have the thing together and it works great. However, I notice that 16F627 is not included in the device list. Any ideas?
James Newton replies: Find a simular chip in the chip data file and make a new entry. Please consider sharing what you develop.+
I am interested in the "Tony's pocket programmer kit". If this is the appropriate place to post questions: Does this kit have all the parts including the board, LCD, components, and chips? What is not included? It looks like one of the chips is a microcontroller. Does that come preprogrammed? Is the ZIF socket included? What is the cost if it doesn't? If this is not the right place for questions, could you please reply with where is? Thank you.
James Newton replies: Yes, Everything except the ZIF socket, you have to buy that yourself, the microcontroller comes pre-programmed, the ZIF socket is NOT included, questions are fine here, you are welcome+.
Hi, is it possible to purchase the pocket programmer pcb on it's own? I all ready have most of the componets needed so do not really want to puchase them as well. Thanks.
MGP says: "I've got one and it works great. I bought it for it's low cost and features but I've found it quite handy for updating software in the field." +
Interested:
Comments:
can any body help me find tony nixon's email address ,coz i had his email and had many contacts with him but now hdd of my pc crashed and i lost every thing.and there are no messages in my out box so that i may get his address.but i remember he was in monash university in those day .
any help in this regard highly appereciated
James Newton replies: Tony moved on to a career as a pilot and instructor. He doesn't even own a computer anymore.+
Code:
| file: /Techref/microchip/pocketprog.htm, 36KB, , updated: 2021/12/13 19:27, local time: 2025/4/5 16:33,
owner: size111-hotmail-,
3.133.13.2:LOG IN
|
| ©2025 These pages are served without commercial sponsorship. (No popup ads, etc...).Bandwidth abuse increases hosting cost forcing sponsorship or shutdown. This server aggressively defends against automated copying for any reason including offline viewing, duplication, etc... Please respect this requirement and DO NOT RIP THIS SITE. Questions? <A HREF="http://linistepper.com/techref/microchip/pocketprog.htm"> Tony Nixons Pocket Programmer</A> |
| Did you find what you needed? |